Showing posts with label Cocoa Vanilla Studio. Show all posts

Thursday, August 2, 2018

Clear Scraps Heart Pallet Shape

Hello...I'm back! I don't know why I'm so bad at blogging but I am. I  guess I can partially blame it on the fact that I started a new job in April. I'm working part time as a merchandiser for American Greetings at our local Meijer. I  really like it because I'm getting to be around cards and stationary..kind of reminds me of when I  used to work at our local scrapbook stores.  

Today,  I'm sharing a recent project I created for the Clear Scraps design team.  New Wood Frames and Pallet Shapes were debuted at the show back in January and they are so fun to work with! Here, I    used the Heart Wood DIY Pallet Shape with a favorite photo of my kids. 


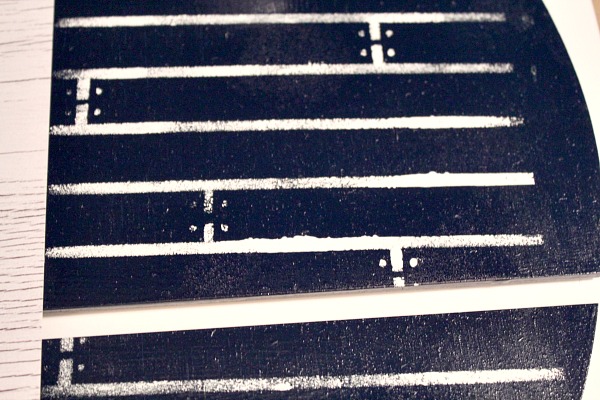
I   usually use chalk paint on the wood pieces because I love they way it looks. And I    had intended to do so on this piece, but the blue chalk paint I    had picked out was too light for my paper.  So, the next best thing is spray paint! Especially with these bigger pieces, its nice for faster coverage! After my paint was dry, I  wanted to add distress to my background. Using the 6 Inch Shiplap Mascil and white chalk paint, I  lightly dabbed paint to the front of the heart.  I  did not worry about clean lines and ensuring even coverage.  

Here is the end result after removing my Mascil! Again, it isn't perfect and that's ok! 
I  then used pieces from Cocoa Vanilla Studio's Wild At Heart collection as well as chipboard pieces from Clear Scraps.  I  painted the Cherish Chipboard Word Title with white chalk paint. Once dry, I    added a generous amount of Distress Crackle Paint in Clear Rock Candy to the surface.  
 I  used the same technique on one of the hearts from the Hearts Chipboard Embellishment Set and adhered to one of the frames from the Wild at Heart line.  
 You can see I  added some stenciling on this side of my photo as well. I    confess it did not turn out as well...the thing about mistakes is that they can usually be covered with sticker or some type of embellishments! LOL 


Thank you for stopping by! Check out Clear Scraps shop to see the new releases!  Have a great night!


Wednesday, May 16, 2018

Clear Scraps: This Is Us Chipboard Word Title

Ack! I'm so behind on blogging!  I don't know what happened...I kind of fell out of habit but am determined to start being more regular.
Today, I'm sharing a layout I created for Clear Scraps using the This Is Us Chipboard Word Title.  This particular title has been very popular as you can imagine! I  worked the CKC show in St. Louis last month and it sold out!


To color my chipboard, I  used a grey colored chalk paint to match the Cocoa Vanilla Studio collection I  used (More Than Words).  

My grey looked a little too flat so I added some clear glitter embossing powder to the front! This is a go-to technique of mine to add texture and sparkle!

Here is the end result! I  love how it turned out! You can also see I  added in some modeling paste to the background as well. 

 More Than Words has lots of fun embellishments to use such as this beautiful tag as well as die cut flowers!

More flowers layered with a frame as well as flair! I  love that CVS always has coordinating flair incorporate into your  projects!

Loving this pink ledger paper print! I  layered some stickers along with enamel dots from my stash at the top of my page.
 More modeling paste! I  used the dots in the 6 Inch Circle Heart Mascil!

Thanks for looking! Visit the Clear Scraps shop to see all of the new Chipboard Words and Shapes! 
Have a great night!


Thursday, February 8, 2018

Dream Big


Happy Thursday!  It's almost the weekend!  Today was my last official day at work...I  have mixed feeling about it and may or may not have cried after I  left. Anyway, I  won't get into that. Instead, I    want to share one of my favorite layouts I  created for Clear Scraps.

The Dream Catcher Chipboard Embellishment is the focal point of my page and I'm going to show you how I  added my color!  

I    first painted the Dream Catcher with white acrylic paint....a couple coats is usually sufficient. 

Next, I  applied my embossing ink to the front of the chipboard.  I  then layered three glittered embossing powders across the dream catcher. I   didn't create definite borders and allowed my colors to intermix. 


And here is the end result! I  love how it turned out...I    wanted to match the ombre effect of the chipboard on my title and the feel of the collection I    used. 


I  used "Pie Chart Heart" by Paige Evans (#219822) for my background and inserted different patterns from the Bohemian Dreams collection by Cocoa Vanilla Studios.  


Thanks for stopping by! Check out all of the variety of Chipboard Embellishments by Clear Scraps by clicking HERE! Have a great day!


Monday, February 5, 2018

Hello 2018

Look who's back! I've really neglected my blog this past six months! One of my new goals was to blog more...and here we are into February already LOL  Better late than never right?  To be honest, I've been dealing with some unresolved health issues and my energy has been lacking.  I  put my notice in at work the beginning of December however I'm still working 1-2 days/week to help cover. 

Today, I'm sharing a layout I  created for Clear Scraps using the new 2018 Chipboard Word Title. Its always fun to make a page about goal/resolutions for the new year.  I've learned to not be too rigid with my rules; especially lately. 


For my title, I  used the chipboard "hello" from Cocoa Vanilla Studio's Bohemian Dream along with the Clear Scraps 2018 Chipboard Word Title. And I'm going to show you how I  colored my chipboard! 

I    almost always start with a few coats of acrylic paint for my chipboard to give it a good base.  Here, I  used a basic white paint; it soaks into the chipboard well so three coats is usually good. 

Next, I  used my embossing ink and glitter blue embossing powder. After I  set with my heat gun, I    went back and added more embossing ink and a glitter light pink embossing powder. You can see the area that didn't quite get covered.  My rule is that almost every mistake can be covered up with an embellishment thus the heart sticker LOL 


Frames are one of my favorite shapes to use! Here, I    layered both chipboard and die cut pieces in a line across my page.  I    inserted small embellishments in or around the frames. 


Thanks for reading!  Check out all of the fun chipboard shapes by visiting the Clear Scraps shop
Have a great day!