Wednesday, October 31, 2012

Trick or Treat! Smell My Feet!

Happy Halloween everyone! Today is such a fun day...I love the costumes, the trick or treating, and jack-o-lanterns!  Halloween, to me, is such a stress free holiday.

It's going to be cold tonight in Central Illinois so I'm not sure how much trick or treating we will do. I'm sure the kids (and me) will be bundled up!  Oh well...that's what happens when you live in this part of the country. You never know what the weather will be. I remember a few years ago, it was in the 70's.

Today I am sharing a Halloween layout I did for the Clear Scraps design team.  I made my own spooky acrylic shapes to go along with my project.  One of the great things about acrylic is that you can run it through your die cut machines (FYI, you can also emboss acrylic!).

Here, I used my Tim Holtz Movers and Shapers mini bat and skull die.


For the skull, I lined the edges with Glossy Accents and then sprinkled it with Ranger Dry Stickles Glitter. 
Just a note, the glitters goes everywhere so use it sparingly.

For the bat, I used Tattered Angels Glimmer Glaze. 


You only need one generous coat. Make sure you swirl the bottle first to ensure you get enough glitter on your brush. 


I set them aside to dry while making my layout. I used Authentique's Enchanted collection for my project. Authentique is one of my favorite paper companies.  They always have fabulous prints and fun coordinating cardstock stickers. Plus, they have a company pug! (a shout out to Coco!)


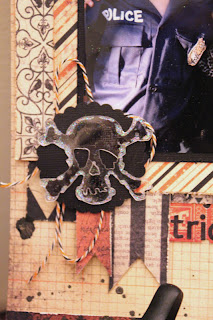
Here is a close up of my skull.  I glued it to a black cardstock scalloped circle with Glossy accents. I also placed a small string of fun Halloween bakers twine from Whisker Graphics.


Close up of the bat. I simply used my Tim Holtz Tiny Attacher!


Showing some of the fun cardstock stickers and alpha. The black ones are some old school Making Memories mini alphas!  


The Boo bingo card is from Jenni Bowlin....another throw back! LOL Some things you just can't let go of...especially ones that never go out of style. 


For my journaling, I used the back of a printed Jillibean Soup kraft tag. On the bottom, I stamped the "remember" from the Pink Paislee Portfolio collection.  To finish, I placed some of my new, fun Halloween flair from {a flair for buttons}.  


I hope this inspires you to scrap those pictures you take tonight! Everyone be safe and have fun!
Thanks for reading! -Jen


Tuesday, October 30, 2012

Vintage Finds mini book and card

Hi everyone...I'm back to share some projects I created with Teresa Collins' Vintage Finds collection.  I am a huge fan of Teresa Collins! I love her prints and the texture of the paper. And the embellishments never disappoint!  These projects I did as part of my assignment for design team at The Scrapbooking Studio!

First off, I used Teresa's Memory Keeper 3-ring Binder to showcase some professional pictures I had taken of my kids. The chipboard was very easy to cover. I loved "loading" up the embellishments on the front as there is so much to choose from!  On most of the papers, I used my distress tool as well as brown distress chalk ink.


A close up of the layered flowers that come with the collection. I not only distressed the edges, but crinkled the paper to give it a more distressed look.   The beautiful blingage in the center is just a perfect focal point for the front!


Showing some of the die cuts and cardstock stickers that come with the collection. I also am loving the coordinating trim and bakers twine! I had to add a little piece of Blingage to my "remember" sticker!  


I wrapped some of the trim around the binder and added a fun Tim Holtz Ideology trinket.  


Note more blingage!  I think that was my last pin :(  I wish I could find more.


Loving the hexagons! I added some Maya Road chipboard hexagons (which I misted) in with the cardstock stickers. 


One of the things Teresa released this year was a pack of border strips with each of the collections. I love the glittery gold!  Also, many of the ticket border strips had perforations so you can break them up.


Adding more of the layered flowers, as well as a wooden veneer heart from Studio Calico.


For this page, I simple punched out two inch circles and lined them down the right hand side.  Next, I stitched through the centers, allowing only one to "pop up". 


More embellishment goodness!  


Note the old school Teresa stamp at the top of the page!  :)  I also used an AE Studio stamp as well. 


One of the pieces of black flower trim from the Posh collection


Here is a close up. I added a piece of flair from {a flair for buttons}. 


More Studio Calico on this page. I am loving the starburst wooden veneers. I misted it with black Maya Road mist and made sure it circled  the "Life is Good". 


Lastly, is a card I created with Vintage Finds.  For part of my background, I placed 2 inch scalloped squares onto black cardstock and then stitched around the edge. I layered on of the bingo cards on top. 


For the butterfly, I ran a square piece of patterned paper along with the Tim Holtz mini butterfly die through my Vagabond. Love the reversed image!  I added a Maya Road trinket pin as well. 


Thanks for reading! -Jen


Monday, October 29, 2012

Clear Scraps Fall Owl mini album

Hi everyone. Sorry for my absence. I have been trying to get my energy back. It's not coming as fast as I'd like and I'm frustrated.  So please bear with me.

Today I am sharing a fun owl acrylic mini book I did for the Clear Scraps design team.  Using Jillibean Soup's Country Pumpkin Chowder Collection, I covered most of the pages of the album.


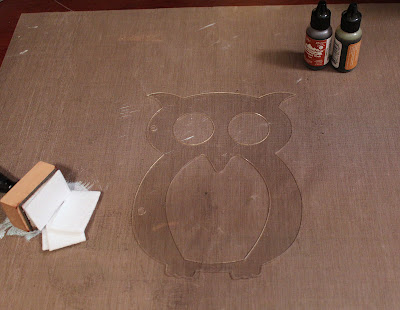
For the front cover, I used Ranger alcohol ink to color the acrylic as I wanted to leave it blank to allow the 2nd page to show through.


I lightly applied the alcohol ink to my applicator.


Then, I applied the ink in a circular motion to the acrylic.


The nice thing about acrylic and alcohol ink is that it dries quickly and is easy to apply. You can also add in additional colors as well.  


Inside of the second page that I used for journaling.  I love the die cuts and journaling cards that coordinate with this line! I even added some flair from {a flair for buttons}.


Love the colors of this line!  Here I popped up the center of the die cut and added a decorative pin from Maya Road and wooden veneer bird from Studio Calico.


For this page, I incorporated a tag from Jenni Bowlin and kraft envelope from Maya Road under my photo.  I added a some baker's twine from Whisker Graphics as well. 


It's hard to see in the picture but for this page, I did not cover it with paper. Instead I allowed the front and back photos and embellishments to mirror each other. I just used one of the die cut journaling tags and my photo. I added some fun pennants that I hand cut, as well as a cardstock sticker tag to journal.  Of course, I have to add baker's twine (one of my favorite embellishments!)


Here is the backside...again I used a photo and die cut journaling tag. Across the bottom of my photo, I cut out "The Good Stuff" from one of the journaling cards and added washi tape from Bella Blvd


For this page, I covered it with patterned paper. On the bottom right hand corner, I used a stamp from the Pink Paislee Portfolio collection. 


Here, I used a milk cap from our flea market at The Scrapbooking Studio and stapled one of the die cut circles to the top. Underneath, I added a small amount of Maya Road tulle trim. 


For this page, I used one of the Jillibean Soup corrugated letters (which I love) !  In the top right hand corner, you will note a very old school Pink Paislee stamp. LOL I am a bit of a clear stamp hoarder. Although you'd be amazed on how much I have gotten rid of over the last couple of years. Some stamp sets I refuse to let go of!


That is all for now! I promise to have some more fun projects up this week!  Hope this was inspiring to you! Thanks for reading!
Jen